Sunday, 1 December 2013

Kids Hanging Christmas Decoration

My three daughters have been keen to have some 'crafty' time with mum...so on Saturday we shipped all the boys off to the park with a football and had an hour to get creative!

Our stake does an annual Festival of Nativities, so since I'm helping in the Children's craft room this year I thought I'd get them to make something I could display in the room for ideas of what children can make.

This was one of the items the girlies made (age 7-11)....


...and yes, we were all still in our PJs, haha, the best way hey!!?!

Materials needed
CD/DVD - old or blank
wadding
material
felt
ribbon
hot glue gun

1. Put a small amount of wadding on top of the CD, then place it on the back of the material you are using as the cover, with the wadding in between the cd and the material.  

(Our material measured approx 24x24cm, yours could be smaller if you use a larger piece of felt on the back) 


2. Use a hot glue gun (with assistance) to glue the fabric to the cd, we folded the top section down first and glued it, then folded the material around bit by bit, gluing as we were going.


3. The back ended up looking like this, no worries how it looks as you can cover it up....stick your ribbon in the middle and to the edge of the cd so that it will hang correctly.


4. Choose what shape you are going to put on the back, my daughter chose to cut out a red felt heart.


5. For the front she chose to do the word 'JOY', so to help my girls not waste a load of felt and also to help get a nice edge, we ironed some freezer paper to the felt so that they could draw their words/shapes on the paper, cut them out and then peel it off ready to stick on....or to make it really easy (esp for kids) just use self-adhesive felt.


My other daughter made this one....


Just a note...you can cut a larger circle of material and do a large running stitch around the edge of the circle to then gather the material in, and this should make it look more circular when finished.

Enjoy being crafty, and don't forget to wear your PJs ;


Christmas 'Tag'


Several weeks ago a good friend of mine, popped over for a play day....and boy did we play!! ;)

We were chatting about how we wanted to help spread the Christmas cheer into our local communities and to be more unified as church members, and this idea was miraculously born!  Somehow it all came together soooo quickly and we couldn't stop high fiving and squealing with delight to each other (no joke!!).


Materials needed
Tag
Long ribbon
Red sharpie (felt tip)
Sakura Souffle - white (my new found love)
Distress Ink Pad - walnut stain
Christmas 'Tag' poem

1. Write Christmas 'Tag' using the red pen and then use the white Sakura Souffle pen to make snowflakes...this pen is magic, when you write it will be clear but wait for a couple of minutes and it will magically turn white!!! LOVE!!!


2.Then use your distress ink pad to dab along the edges of the tag and the poem, then use a glue stick to attach the poem.


3. Thread through a long piece of ribbon (I love red and white gingham for anything Christmassy) so that the gifts can be attached, mine measured about 50cm.

4. Attach your small gift that can be posted through a letter box eg a christmas decoration, candy canes, chocolate bar, cd, bag of sweets, dvd etc.


5. Next, post your Christmas 'Tag' to your friend, family or someone in your community and quickly run before you get caught!!!  Or you could also put it in a jiffy bag and send it through the post to someone further afield.

And not forgetting (because I almost did, lol!) here's the poem that you need to attach to the back....


In case you can't read that, here it is.....


You've been 'tagged' in this Christmas game,
Now find somebody else to 'tag' the same.
Attach a small gift to post through their door,
And see how the Christmas cheer spreads even more!

This is a great activity to do as a family (my kids love being secret gifts ninjas...yes they hide, crawl, roll just to get to somebody's front door, haha, love it!!!) or youth group and doesn't cost much either, but helps to share the Christmas feeling with everyone.

Merry Christmas....and please let me know how your tagging goes, or if you're a lucky one to get tagged too!! :)


Monday, 21 October 2013

Chalkboard Missionary Badges

Conference was amazing, each of the talks were just so inspiring, I couldn't get enough of it.

I really am going to try to be a better missionary and try to 'hasten His work'.

As I listened to Elder S. Gifford Nielsen's talk, he mentioned how we could pray for the missionaries serving in our area by name, here's what he said....

Second, pray for the missionaries serving in your area and their investigators by name every day. The only way to do this is to greet them, look at their badge, call them by name, and ask them who they are teaching. Elder Russell M. Nelson wisely contributed, “Until you know a person’s name and face, the Lord cannot help you know his or her heart.”

I don't know about you but my memory is crazy since I've had kids, and I find it really hard to remember things let alone new people's names....and with the Elders sometimes their surnames can be pretty hard to remember.

So I made some chalkboard fridge magnets with Elder across the top, so that we could then write the surnames of the Elders serving in our ward underneath....and then when they move, we can then change them.


I got some mdf cut the same size as a missionary badge, and then painted it with three coats of chalkboard paint.  When it was dry, I used a Sakura souffle pen to write the 'Elder' across the top...it looks very clear and watery when you first write it on, but give it a couple of minutes and it goes super white like in the picture above...it's like magic, it's soo cool!!  haha, what am I like??!?

Then put a magnet on the back and you have your fridge reminder or what the names of the missionaries serving in your ward are...we are one step closer to being better missionaries :)


I then decided to make some as gifts, I made them permanent though, one for my nephew who's on his mission now and the other for my friend who's just about to leave.

I'm so grateful for the missionaries who are currently serving all over the world, and for the wonderful work that they are doing.  I hope that I can be a better missionary, and even if what I am doing feel like baby steps, in the famous words of Walt Disney I've just got to "keep moving forward".


Thursday, 25 July 2013

Sweet Words to the Soul


We've been playing this 'game' at the dinner table since February, at first we did it every day and now over time we probably play it just once a week.

It takes no preparation, just a family sitting around a table eating dinner together...and it doesn't even need that!!  We tend to do it when we've finished our meal or when we are waiting for pudding/sweet to be served (that makes us sound posh, like we have servants to tend to our every need, oh how I wish!!)

Anyway back to the real world where my kids are delightful, treat each other nicely and are angels all the time....oh how I wish, lol.  Seriously though as I was reflecting on one of my children's behaviour and how negative comments seemed to be outweighing the positive ones, this idea just popped into my head (I love it when that happens).

The first time we played the game, I told everyone to stay seated after dinner and to look at the person opposite them and say 5 nice things about them and then for the receiver to do the same.  Luckily we have eight people in our family, so we were all paired off.  But if this doesn't work for you, then you could do it so that they say the 'sweet words' to the person to their left??

Some of our children had compliments flying here, there and everywhere...while some were struggling to come up with just one!!  And even then, the so called lovely words were actually being a bit nasty....'Mum, dad, was I ever like this??!!!?'

So the next day we did it again...we heard 'yay, I love this game' vs 'groan, moan, not again!!!'  But it was lovely, as they sat there the words were making them smile inside and out, so that the once grumpy faces were erased.  Soon the negative feelings towards the game changed and everyone was making sure that they sat opposite different members of the family each night so that they could hear what they had to say about them.  Our two youngest children proved to be the most popular to sit opposite, everyone loved being on the receiving end of their compliments as they were sooo from the heart :)

I love hearing my children say nice things to each other, and watching the heart of the receiver soften as they are being said.  It's also nice to stop as a parent and just look at your beautiful child and see them full of goodness no matter what sort of day you've had with them.

The words of Proverbs 16:24 are still true today...

 Pleasant words are as an honeycomb, sweet to the soul, and health to the bones.


Monday, 17 June 2013

Missionary Badge Pocket


I was desperate to share this post before Fathers day so that others could do it, but alas as I was giving this gift to my hubby, I had to wait.....but hey there's still upcoming birthdays, Christmas, returning missionaries etc. that it would be great for.

This was another idea inspired from General Conference (April 2013), it was from a talk given by Neil L. Andersen entitled It's a Miracle where he said....

And returned missionaries, find your old missionary tag. Don’t wear it, but put it where you can see it. The Lord needs you now more than ever to be an instrument in His hands. All of us have a contribution to make to this miracle.

It took me all of 5 minutes to make this gift, especially as I got lucky and found my hubby's missionary badge right at the top of the first memory box I opened :)


I simply got one of my sons shirts and cut around the pocket, leaving enough excess material so that I could wrap it around the back of the glass in the frame....sorry about the photo quality but this was being done late at night, whilst trying to be quiet and quick about it!  There's nothing like the last minute rush!??!!

I didn't attach the material to the glass as I thought I could then take it off and wash it if needs be...as I slipped the badge on I got all choked up, it looked really lovely for more reasons than one.  I hope that my three sons will be inspired by seeing it daily around our home and that they too will choose to serve a mission when they are older. 

I'm thinking that I might make a frame for each of my boys with their names and the phrase 'I hope they call me on a mission' printed on the shirt pocket where their badges would be, so that we would end up with a wall of frames.  Then when they've served their missions they too can put their badge up as a reminder to themselves and us all to be missionary minded at all times.


Wednesday, 5 June 2013

For Peace at Home

I can't believe it's been two months since Conference, time is just flying by!!?!  I loved conference and didn't know where to start with the things I've learnt and the FHE's and activities that we've got planned....soooo excited, can you tell??!?  We decided to start with Elder Richard G. Scott's talk entitled 'For Peace at Home'.


As Elder Scott spoke the words below in his talk an image popped into my head and I sketched it down in my notebook so that I wouldn't forget.

I’m sure you can identify the fundamental principles that center your home on the Savior. The prophetic counsel to have daily personal andfamily prayer, daily personal and family scripture study, and weekly family home evening are the essential, weight-bearing beams in the construction of a Christ-centered home. Without these regular practices it will be difficult to find the desired and much-needed peace and refuge from the world.


I'm still not super duper at doing graphic images but I'm good at sharing (lol) and hopefully getting better at it as I go?!!  Well this is what I came up with.


We used this talk as our guide tonight for FHE, there was sooo much in the talk that we could focus on, and I didn't want to leave any of it out, so I broke it up into smaller bite size chunks/topics so that the kids could take it all in.

I stuck a picture of the Saviour in the centre of a piece of paper and after we had read each of the quotes from the talk, we discussed them and then wrote on the paper what we could do to make Christ the centre of our home.


This is now stuck on our kitchen door as a reminder of what we are going to try to do to make our home more peaceful (here's hoping!!) and Christ centered.

For the activity at the end of the lesson, everyone got a strawberry lace and we put a big bowl of Cheerios in the middle of us all.  One by one we had to say something that made us 'cheery' (aka happy), and then we could put one cheerio on our lace...we set a time limit of 5 minutes to do it, so everyone was trying to think of things to say as quickly as they could.


It started off well with the kids saying things and quickly threading on their Cheerio so that they were ready for their next go.  It was only as we were half way through the game that the older kids noticed that every time they were saying something my three year old was repeating it and handing a Cheerio to his dad to thread on...hence his lace had lots more than the others, then everybody just went for it and shouted out lots of 'cheery' things with no waiting this time...it was really funny, and we had such good giggle at it all.

I really enjoyed the lesson and game tonight, but more so the game...it wasn't particularly peaceful, but hopefully we heard some of the things that makes others in our family happy, and will look for ways to make them cheery in the future.  Playing the game was easy, but the further it went on, the harder it got...but as I heard some of my children's answers it made me reflect on lots of wonderful things in my life that have brought me so much happiness and joy.  We are all so blessed in so many different ways, we've just got to stop, look and think and we will find things that make us 'cheery', no matter what our circumstances  :)


Wednesday, 8 May 2013

Visiting Teaching Report Sheet


I was recently called as a visiting teaching coordinator and I'm very lucky to have five great women working with me as district supervisors.  

We held a training meeting the other day at my house, it was lovely to sit and discuss together the beginnings and importance of visiting teaching along with ideas, concerns etc.  I found Chapter 7 of 'Daughters in My Kingdom' really handy when compiling my thoughts and instruction.


I gave each of the supervisors a wallet containing the list of companionships in their districts (you can get this off of MLS), also a great quote from Thomas S. Monson on the importance of reporting, post-it notes, pen, highlighter, and some visiting teaching report sheets. 

I thought the VT report sheet would help to remind the sisters of their need to report their visiting teaching, as well as help the supervisors to collect their information in.  We put the sheets on a little A5 clipboard with a trimmed down Relief Society Purpose Poster on the back it and used self-adhesive film to attach it.


We hand round the clipboard at the beginning of Relief Society each Sunday so that the sisters can take a sheet to fill out at home or complete there and then.


You can't see from the photo but at the bottom of each sheet we included a list of all the supervisors/coordinator names, telephone numbers and email addresses.


Click on the link above to download the report sheets, (you can choose from 4-6 sisters visited).  I hope this idea helps your wards and branches to collect the information, but more importantly to do their Visiting Teaching.

Tuesday, 16 April 2013

Easy Peasy Cushion Covers


I made these cushion covers last night and I love 'em...I'm thinking I might get protective of them when it comes to sticky fingers!! I made the plain cushion at the back in 30 minutes (from start to finish) and the ones at the front took me just over 45 minutes to make....my mind is whizzing with all the possibilities for the ones at the front. :)

The cushions are made from just one long piece of fabric and as I haven't attempted zips yet so they are just envelope style.


Measure the width and height of the pillow you want to cover.  Mine measured 18" wide and 13" high, so for the width I multiplied it by two, added on 1" for seam allowance and then 5" for the overlap on the back (you could make the overlap slightly larger if you want)...so total width added up to 42".  For the height I just added on 1" for the seam allowance.


I cut my fabric using my measurements (42" x 14").


Overlock the smaller ends of your fabric (so I sewed my two 14" ends)...my overlock isn't too great on my machine so I use my zig zag stitch and let one point go off the fabric so that it rolls the edge and stops it from fraying.


Turn over the now overlocked ends (1-1.5cm) and sew using the edge of your machines foot along the edge of your folded fabric.


Ignore this bit (and the next few) if you are just doing a plain cover...pin your printed fabric making sure it sits central to your cushion, make sure to check the over lapping of the fabric on the back is fairly central.  For how to print onto fabric click here for one of my previous posts.


I sewed round my fabric twice, the first time I just did a straight line, the second time I did a bit of wiggling...I like the finished result and the frayed edge, but you could appliqué etc.


Have the front of your fabric/pillow face up, then fold one end over and then the other...work the fabric so that it is the width of your pillow (making sure if you have attached a design/fabric that this is still central) and so that the overlap is fairly central again, then pin along the top and bottom.

Sew along the two pinned edges using the 1cm guide on your sewing machine, and then overlock the two edges you've just sewn to stop them from fraying.

Turn the pillow the right way out and ta da you have a super duper pillow case for your settee.


Sunday, 7 April 2013

Preparing for and Reviewing General Conference #3

One of these days I'll be super prepared and get my posts on here before General Conference starts, lol!!  Well it's another 'can' idea but for General Conference this time, also below is a great link to 'The ultimate guide to General Conference with kids'...a must for anyone with children :)  


General Conference Preparation


I've made a 'can' for each of my kids this year and have filled them with pens, felt tips, crayons (for the younger ones), and some sweets...I find doing these quirky little things generally helps with my kids concentration and also they get really excited for Conference too.  I printed the phrase "I 'can' listen to the Prophets and Apostles" on some card and used lots of my 'DIY Mod Podge' to stick it on.  Voila!...job done :)


I put a big packet of love heart sweets in each one and the plan is each time they hear the word love (or something about love) being mentioned they get to have one....I'm guessing the younger ones will have finished theirs before the opening prayer, lol?!!?! 


General Conference Review


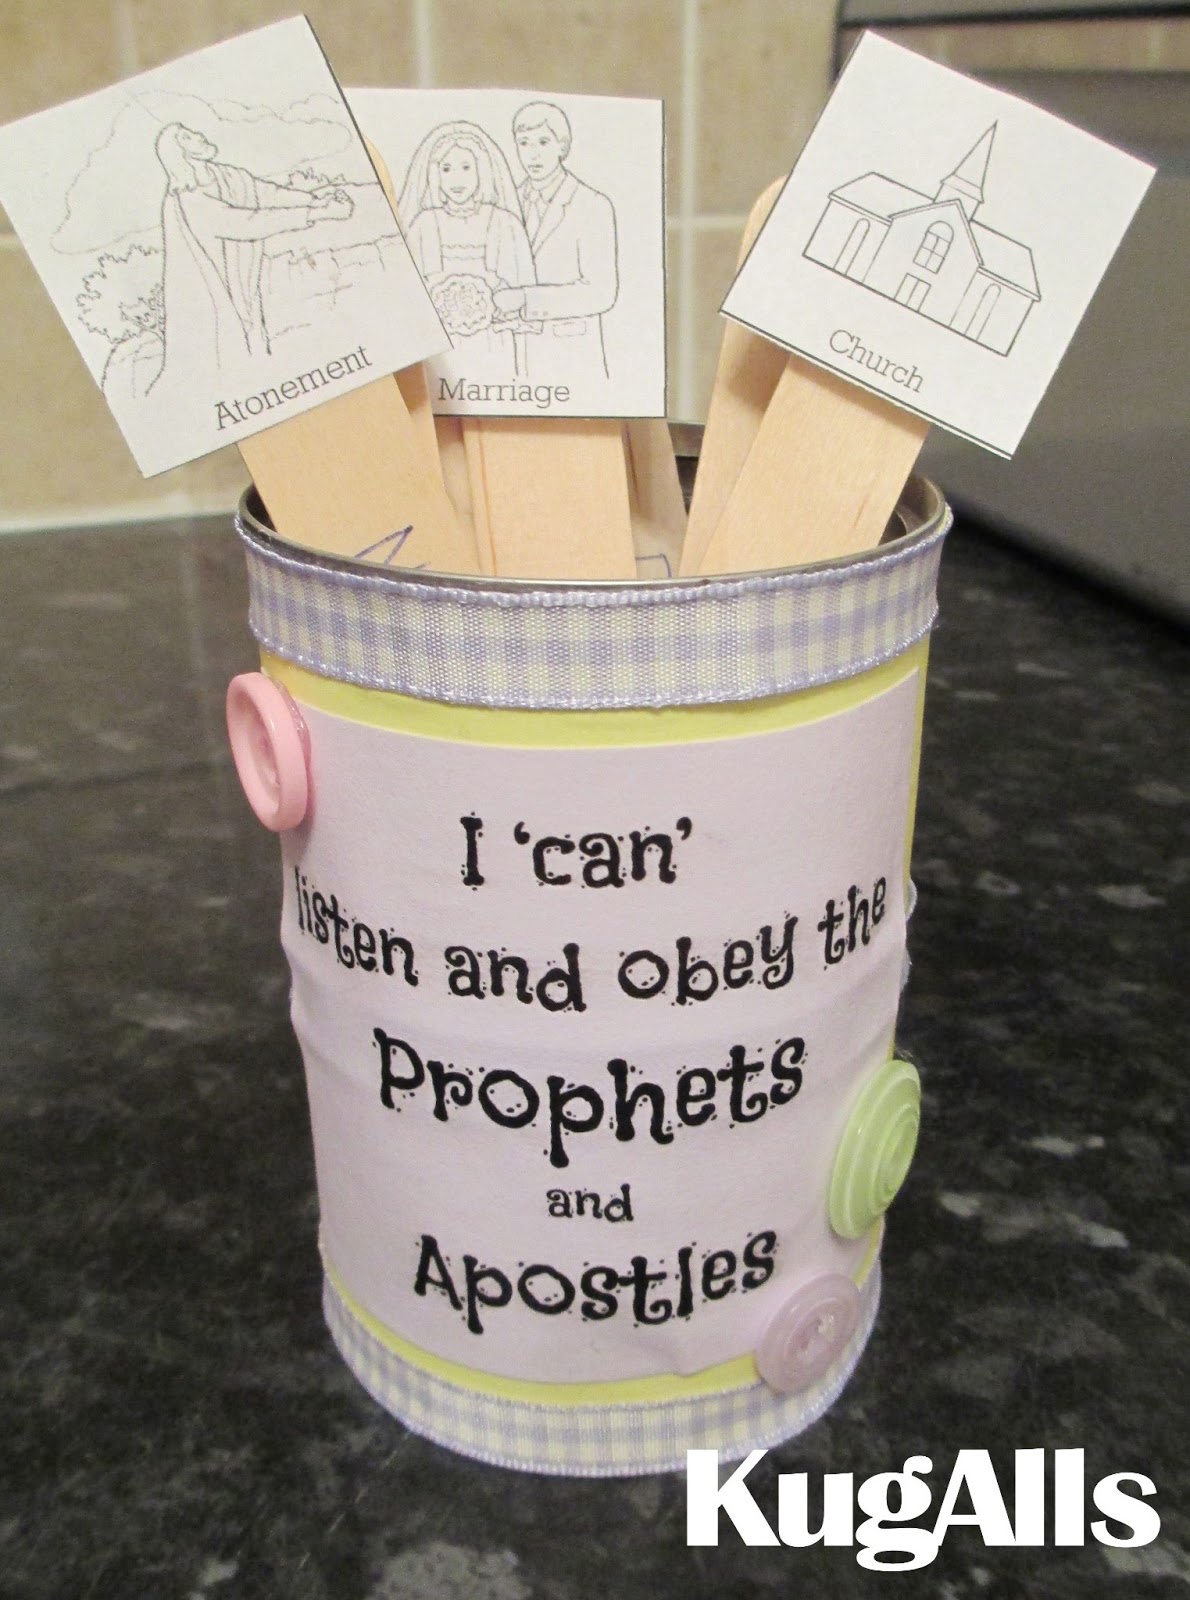
Very similar to the above except with the words 'I 'can' listen and obey the Prophets and Apostles'.  On the Monday after Conference for FHE we are going to go through our General Conference Notebooks and decide for each talk what conference square picture to stick at the top of their named lollipop stick.  


Then on the back of the stick we will write a goal/idea of what we can do to follow the council given and review these during the next six months for FHE/family councils/goal setting etc.


This is going to sit on our mantle and I'm hoping it will be a daily reminder for the children and us to look through and remind us of the talks and council given at conference :)

Looking for other ideas??  The website shown below has a stack load of great links for all different kinds of activities, colouring, games etc, why not take a look it's great :)

ideas, games, and activities for general conference with kids

lds.org also has a page specifically designated for General Conference Activities for Children too.

Hope you enjoy watching Conference with your family and loved ones xx.