Showing posts with label Kids. Show all posts

Tuesday, 16 June 2015

Nautical Boodle Headbands


Another post about what we got up to at Young Women's (YW) Camp.  We found lots of great headbands on Pinterest, but to make the ones we liked, we needed to use 2 t-shirts and cut them up into strips.....errrr too much to ask the girls to bring 2 shirts to camp to cut up; too expensive for us to buy them new and would take far too long for all the girls to cut up!!

Bing!!! Inspiration came....use boodles!!  Boodles is t-shirt material but in a nice long, thin thread, so perfect and soooo much quicker and easier for all our girls to make their headbands, yay, result!! 


We put all the different colours out and let the girls choose their own combination, some went for just 2 but some chose 4 colours (3 strands of each).

They cut their 12 chosen threads to 40", don't worry about them being exact as they get trimmed later....and yes it's quite long but everybody's head size is different, so better to go bigger than smaller when doing a project like this.


We then followed the instructions off the video link below....I had watched this video several times before camp but I found by the time I got there and with all the rushing round etc I'd forgotten exactly how to do it, lol, so I'm glad we had wi-fi available so I could watch it with the girls the first time and have this lovely lady talk us through it....


I practiced the nautical knot using just 2 strands and ended up making a ring, lol...you could easily use 4 lengths of boodle and make a nautical bracelet too :)

And if you've got any left, in my house the boys like to tie it round their heads as it instantly makes them into ninjas (?!!?!), and my girls love plaiting them and making bracelets.  Lots of people crochet with boodles and make some beautiful things.  

Have fun creating and making with boodles.


Wednesday, 1 April 2015

20+ Ideas for memorizing the Articles of Faith


Memorizing the 13 Articles of Faith can seem like a mammoth task to anybody - old or young...I personally still get a bit muddled up trying to quote #10!!

So a while ago I printed up the Articles of Faith on A4 card for my kids and laminated them (of course!), they are now regularly used around the home - in bedrooms/kitchen/before family scripture study/FHE to help and remind us of them.

Recently I made some smaller cards which have the first letter of each word each of the Articles of Faith, this is great to help the older children, and super for popping in your Sunday bag to help keep them entertained during sacrament.

Thought I'd look online and find some other great ideas to help my children (and me) become better at learning and memorizing them...lots of links & pictures are below. 


Articles of Faith flashcards -- All Things Bright and Beautiful
1st Article of Faith -- LDS scripture study for kids
8th Article of Faith -- LDS Games
Articles of Faith cards -- Latter-day chatter


Article of Faith posters -- A year of FHE

1st Article of Faith -- LDS Games


Articles of Faith keys -- Finch Family Games
Teaching the Articles of Faith -- The Giggly Girls Guide
(LOADS of great ideas to help learn AoF in the link above)


Articles of Faith Jeopardy -- Shannon Makes Stuff


Hope you and your family enjoy learning the Articles of Faith
again and again and again :)

Monday, 2 March 2015

DIY Sharpie Tea Towel


A quick, simple yet thoughtful gift to give to family, friends, teachers etc....and its ready in five minutes, well if the kids cooperate!!?!


Materials needed
Sharpie pens (or fabric pens)
Plain tea towel
Lots of hands to trace!

I drew round all the kids hands (preferably get an adult to do the outline as the material needs to be pulled tight so that the pen doesn't go off at random angles!!) and then they wrote their names inside their handprint.


 I traced the phrase 'many hands make light work' from a printout I whipped up...and from experience I made several different font sizes on the one sheet so that I could find the right fit without having to go back and forth to the laptop/printer :)


We gave these to each our mothers for Christmas, they'd also be great for Mothers day.  Hey, why not let the kids go wild drawing any sort of pictures on a tea towel, although I think an embroidery hoop might come in handy to keep the material taut for them as they draw...we wouldn't want any tears now ;)

Friday, 31 January 2014

Daniels in the Lion's Den FHE


My 7 year old daughter organised our lesson for FHE (Family Home Evening) and she did an amazing job, and yes, she did it all by herself!!  It was sooooo simple, but it was really effective and worked for ALL our family aged from 12 to 3 years...and yes, my husband and I are older than 12 years of age, but maybe not mentally, haha!! ;)

This is the script that she read to explain her lesson, in case you can't read it I've typed it out below, spelling mistakes and all...

'Ok.  So this is a kind of game but it is a listening game so you have to listen very carefuly.  
So if I say lion you get down on the floor with your hands and feet, and ROAR as loud as you can, 
but not that loud so you crack a window.  
And the next rule is when I say Daniel you sit down if your a boy and when you sit down you cross your legs.  
And if I say King all the girls act posh like a queen, but you can't be one because their weren't a girl in the story.'

Love it!!! She inserted an additional action for when she said 'Daniel', the boys would have to fold their arms (as well as crossing their legs) so that it would look like they were praying.


She then held up the picture from our Gospel Art Box to show everyone, and then commenced reading the story that is printed on the back....and that was it (told you it was simple).


It was heaps of fun and everybody listened very intently to the story, so that they wouldn't miss out any of the acting.  Our lions got a tad ferocious at one point during the reading and attacked daddy, haha...and by the end of the story everyone was acting out all the parts named.

She was really proud of herself at the end of it all, and so she should be.  It really was such a lovely night and everybody loved her lesson and EVERYBODY got involved, no tears tonight (woohooo!), just lots of KugAlls!!


ps I've checked store.lds.org and I can't find the Gospel Art Box listed anymore (the Gospel Art book doesn't have the words on the back of the pictures)....but you could use the script from this Old Testament Stories (it's not as long though).

Tuesday, 17 December 2013

Santa's Post decoration


These are super cute and very addictive to make, so watch out as your tree may get covered in them!!  It's a really simple activity for the kids to do to and is ready in minutes.


It all started because I had a massive bags of these large lollipop stick 'scraps' leftover from a recent craft project at my church....I was determined to use them in some way, and hey ho, after a little bit of playing, failing and trying again I came up with this idea!!  And just a tip, we found it was a lot cheaper to buy a box of 100 waxing strips than it was to buy 50 large lollipop sticks..they are basically the same thing :)


Cut your large lollipop sticks up to roughly 3cm in length, don't worry about making them exactly the same size as they look better being slightly different lengths.  You will need to cut five 'letters'.  Make one 'letter' look like the front of a letter, then on another one look like the back of an envelope.  Leave the other three blank as you won't seem them.


Then use four strips of thin double sided tape to stick your five 'letters' together, just stack them up without worrying about them being perfectly lined up (it looks like a more authentic stack).  Put the front letter at the top of the stack and the back of the envelope drawing facing out at the back.

Wrap your letters up with some thick bakers twine, I'm sorry I didn't measure my twine, but the length of twine depends on where you will be hanging them, so play around with it and see what looks best...they look really cute on a small christmas tree.

Ho Ho Ho!!!


Monday, 16 December 2013

DIY Christmas wrapping paper

As you know I have a few kids (6 to be exact) and so I have several teachers, teachers assistants, play school teachers etc that I like to get presents for at Christmas.

I didn't have time to search or come up with an idea for something that the kids could make this year, so instead I got them to decorate the wrapping paper and Christmas tags for their teachers....they loved it!!  It was super easy and no mess either, which is always an added bonus.


The kids used my Sakura souffle pen, and just like their mum they love how it's 'magic'....go buy one now, you won't regret it :)

They drew stars, snowflakes, wrote Christmas messages, and one of my sons just scribbled all over the paper and tag and even that still looks good...and as mentioned before it will be almost invisible when you first put it on, but give it a couple of minutes and it will 'magically' appear!!


We just used brown parcel paper, got the tags for 3p each from a local stationers, and tied it up with chunky butchers twine. 

Hope you enjoy doing this as much as we have, Merry Christmas!


Sunday, 1 December 2013

Kids Hanging Christmas Decoration

My three daughters have been keen to have some 'crafty' time with mum...so on Saturday we shipped all the boys off to the park with a football and had an hour to get creative!

Our stake does an annual Festival of Nativities, so since I'm helping in the Children's craft room this year I thought I'd get them to make something I could display in the room for ideas of what children can make.

This was one of the items the girlies made (age 7-11)....


...and yes, we were all still in our PJs, haha, the best way hey!!?!

Materials needed
CD/DVD - old or blank
wadding
material
felt
ribbon
hot glue gun

1. Put a small amount of wadding on top of the CD, then place it on the back of the material you are using as the cover, with the wadding in between the cd and the material.  

(Our material measured approx 24x24cm, yours could be smaller if you use a larger piece of felt on the back) 


2. Use a hot glue gun (with assistance) to glue the fabric to the cd, we folded the top section down first and glued it, then folded the material around bit by bit, gluing as we were going.


3. The back ended up looking like this, no worries how it looks as you can cover it up....stick your ribbon in the middle and to the edge of the cd so that it will hang correctly.


4. Choose what shape you are going to put on the back, my daughter chose to cut out a red felt heart.


5. For the front she chose to do the word 'JOY', so to help my girls not waste a load of felt and also to help get a nice edge, we ironed some freezer paper to the felt so that they could draw their words/shapes on the paper, cut them out and then peel it off ready to stick on....or to make it really easy (esp for kids) just use self-adhesive felt.


My other daughter made this one....


Just a note...you can cut a larger circle of material and do a large running stitch around the edge of the circle to then gather the material in, and this should make it look more circular when finished.

Enjoy being crafty, and don't forget to wear your PJs ;


Christmas 'Tag'


Several weeks ago a good friend of mine, popped over for a play day....and boy did we play!! ;)

We were chatting about how we wanted to help spread the Christmas cheer into our local communities and to be more unified as church members, and this idea was miraculously born!  Somehow it all came together soooo quickly and we couldn't stop high fiving and squealing with delight to each other (no joke!!).


Materials needed
Tag
Long ribbon
Red sharpie (felt tip)
Sakura Souffle - white (my new found love)
Distress Ink Pad - walnut stain
Christmas 'Tag' poem

1. Write Christmas 'Tag' using the red pen and then use the white Sakura Souffle pen to make snowflakes...this pen is magic, when you write it will be clear but wait for a couple of minutes and it will magically turn white!!! LOVE!!!


2.Then use your distress ink pad to dab along the edges of the tag and the poem, then use a glue stick to attach the poem.


3. Thread through a long piece of ribbon (I love red and white gingham for anything Christmassy) so that the gifts can be attached, mine measured about 50cm.

4. Attach your small gift that can be posted through a letter box eg a christmas decoration, candy canes, chocolate bar, cd, bag of sweets, dvd etc.


5. Next, post your Christmas 'Tag' to your friend, family or someone in your community and quickly run before you get caught!!!  Or you could also put it in a jiffy bag and send it through the post to someone further afield.

And not forgetting (because I almost did, lol!) here's the poem that you need to attach to the back....


In case you can't read that, here it is.....


You've been 'tagged' in this Christmas game,
Now find somebody else to 'tag' the same.
Attach a small gift to post through their door,
And see how the Christmas cheer spreads even more!

This is a great activity to do as a family (my kids love being secret gifts ninjas...yes they hide, crawl, roll just to get to somebody's front door, haha, love it!!!) or youth group and doesn't cost much either, but helps to share the Christmas feeling with everyone.

Merry Christmas....and please let me know how your tagging goes, or if you're a lucky one to get tagged too!! :)


Thursday, 25 July 2013

Sweet Words to the Soul


We've been playing this 'game' at the dinner table since February, at first we did it every day and now over time we probably play it just once a week.

It takes no preparation, just a family sitting around a table eating dinner together...and it doesn't even need that!!  We tend to do it when we've finished our meal or when we are waiting for pudding/sweet to be served (that makes us sound posh, like we have servants to tend to our every need, oh how I wish!!)

Anyway back to the real world where my kids are delightful, treat each other nicely and are angels all the time....oh how I wish, lol.  Seriously though as I was reflecting on one of my children's behaviour and how negative comments seemed to be outweighing the positive ones, this idea just popped into my head (I love it when that happens).

The first time we played the game, I told everyone to stay seated after dinner and to look at the person opposite them and say 5 nice things about them and then for the receiver to do the same.  Luckily we have eight people in our family, so we were all paired off.  But if this doesn't work for you, then you could do it so that they say the 'sweet words' to the person to their left??

Some of our children had compliments flying here, there and everywhere...while some were struggling to come up with just one!!  And even then, the so called lovely words were actually being a bit nasty....'Mum, dad, was I ever like this??!!!?'

So the next day we did it again...we heard 'yay, I love this game' vs 'groan, moan, not again!!!'  But it was lovely, as they sat there the words were making them smile inside and out, so that the once grumpy faces were erased.  Soon the negative feelings towards the game changed and everyone was making sure that they sat opposite different members of the family each night so that they could hear what they had to say about them.  Our two youngest children proved to be the most popular to sit opposite, everyone loved being on the receiving end of their compliments as they were sooo from the heart :)

I love hearing my children say nice things to each other, and watching the heart of the receiver soften as they are being said.  It's also nice to stop as a parent and just look at your beautiful child and see them full of goodness no matter what sort of day you've had with them.

The words of Proverbs 16:24 are still true today...

 Pleasant words are as an honeycomb, sweet to the soul, and health to the bones.


Sunday, 7 April 2013

Preparing for and Reviewing General Conference #3

One of these days I'll be super prepared and get my posts on here before General Conference starts, lol!!  Well it's another 'can' idea but for General Conference this time, also below is a great link to 'The ultimate guide to General Conference with kids'...a must for anyone with children :)  


General Conference Preparation


I've made a 'can' for each of my kids this year and have filled them with pens, felt tips, crayons (for the younger ones), and some sweets...I find doing these quirky little things generally helps with my kids concentration and also they get really excited for Conference too.  I printed the phrase "I 'can' listen to the Prophets and Apostles" on some card and used lots of my 'DIY Mod Podge' to stick it on.  Voila!...job done :)


I put a big packet of love heart sweets in each one and the plan is each time they hear the word love (or something about love) being mentioned they get to have one....I'm guessing the younger ones will have finished theirs before the opening prayer, lol?!!?! 


General Conference Review


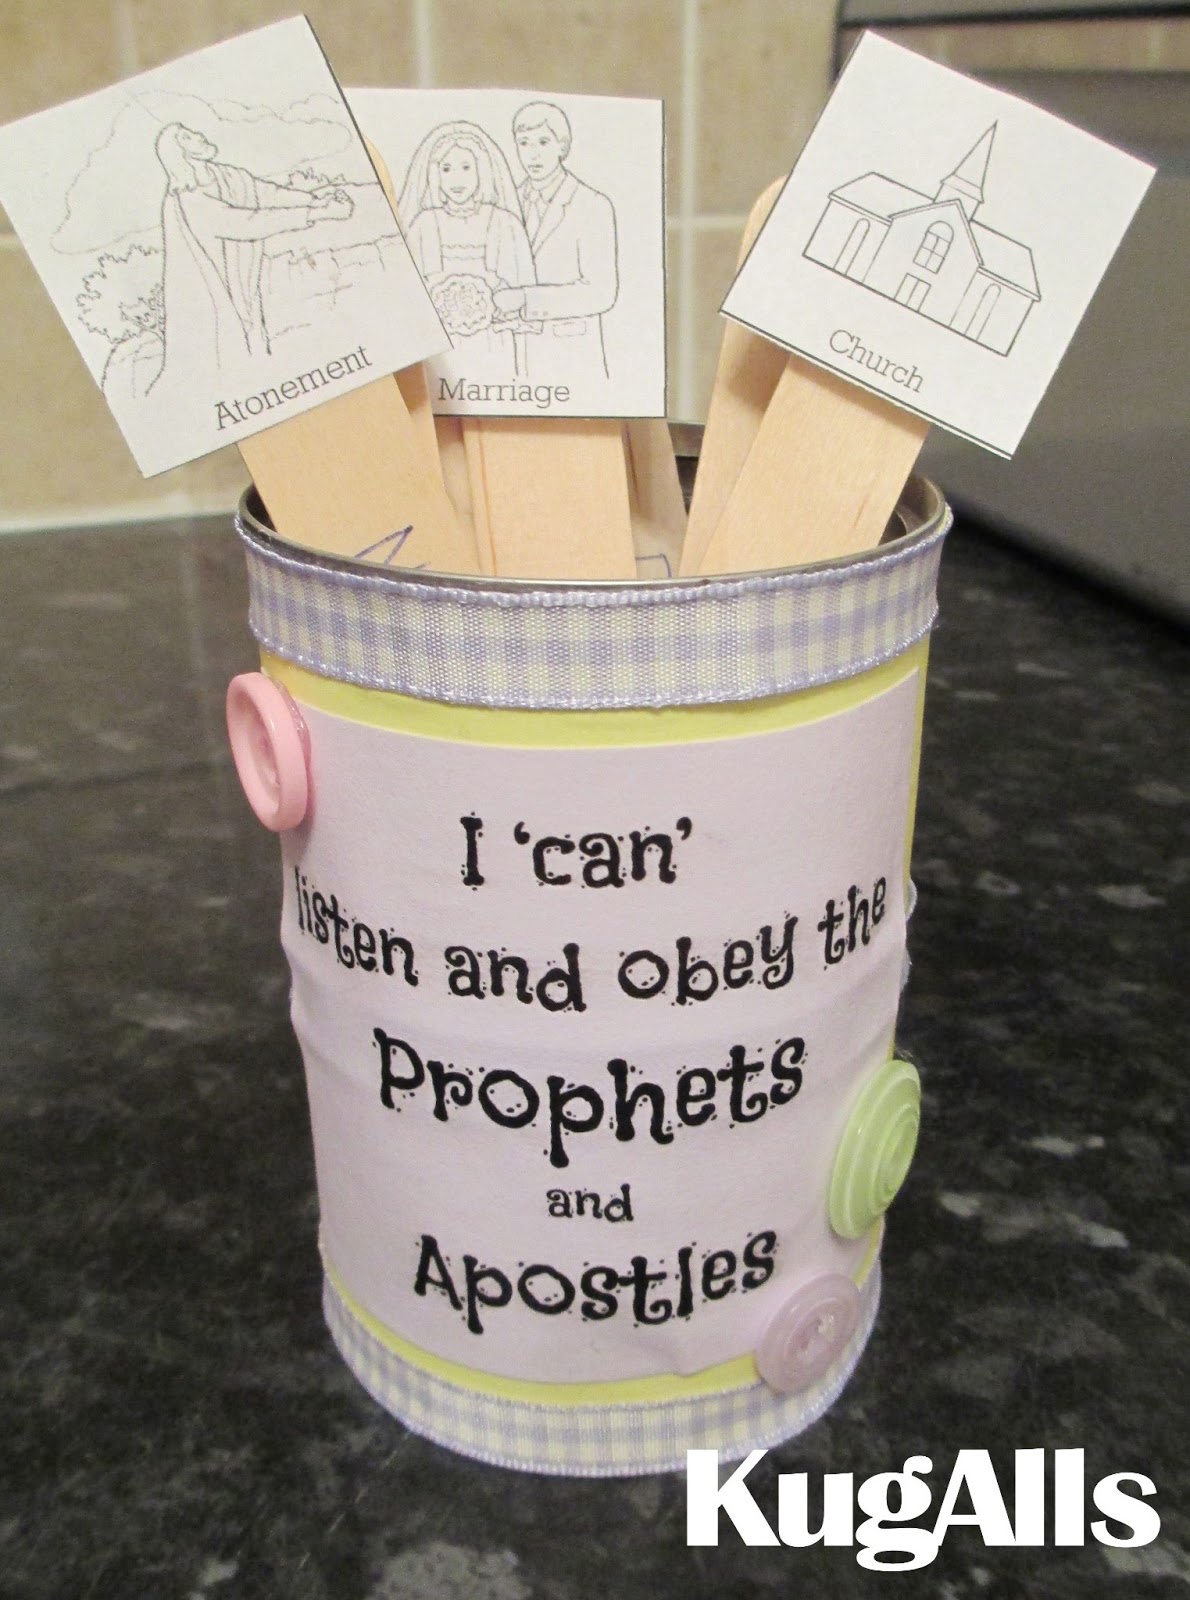
Very similar to the above except with the words 'I 'can' listen and obey the Prophets and Apostles'.  On the Monday after Conference for FHE we are going to go through our General Conference Notebooks and decide for each talk what conference square picture to stick at the top of their named lollipop stick.  


Then on the back of the stick we will write a goal/idea of what we can do to follow the council given and review these during the next six months for FHE/family councils/goal setting etc.


This is going to sit on our mantle and I'm hoping it will be a daily reminder for the children and us to look through and remind us of the talks and council given at conference :)

Looking for other ideas??  The website shown below has a stack load of great links for all different kinds of activities, colouring, games etc, why not take a look it's great :)

ideas, games, and activities for general conference with kids

lds.org also has a page specifically designated for General Conference Activities for Children too.

Hope you enjoy watching Conference with your family and loved ones xx.